Digitizing For Embroidery: Turning Pictures Into Stitches
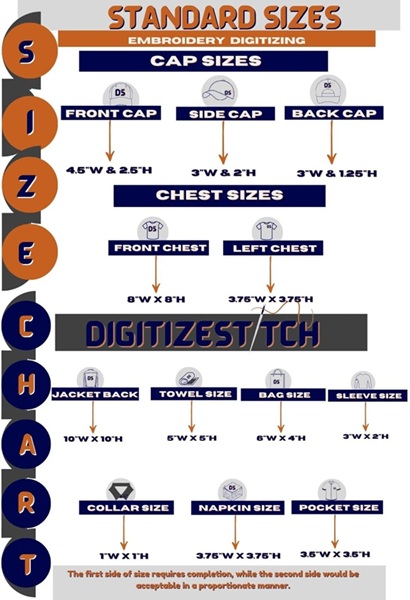
Digitizing for embroidery means changing a picture into a special file your machine can read. First, you pick a design you like. Then you look at an embroidery size chart to choose how big it should be on your shirt or hat. The chart shows inches or millimeters for width and height. Next, you use software or send your art to embroidery digitizing services USA. The digitizer adds stitch paths, directions, and colors.
These steps prepare your design so the machine needle knows exactly where to go. Using an embroidery size chart at the start ensures your design fits well and looks neat. This process turns simple art into colorful thread on fabric. When you finish, your design will match the size you picked on the chart, making your project look great every time.
Why You Need An Embroidery Size Chart
A good embroidery size chart is your best friend when you start a new project. It tells you exactly how tall and wide each design will be. If you pick the wrong size, your art might be too big and fold the fabric or too small and look fuzzy. With a chart, you measure your shirt, hat, or bag first. Then you match that measurement on the chart.
This step gives you clear embroidery size guidelines so you know what numbers to enter in your software or share with your digitizer. A chart helps you avoid wasted thread, broken needles, and unhappy customers. When you always use a size chart, every design fits right where you want it and looks neat and clear.
Follow Clear Embroidery Size Guidelines
Embroidery size guidelines are simple rules that go hand in hand with your chart. They tell you how many stitches per inch to use. If stitches are too dense, the fabric may pucker and look bumpy. If stitches are too far apart, you’ll see holes in your design. Good guidelines help you pick the right stitch density for each design size.
For small logos, you need tighter stitches; for big shapes, you need a bit more space between stitches. These guidelines also help you choose the best needle and thread type. By following clear rules, your design will sit flat on the fabric and feel smooth to touch.
How Logo Digitizing For Embroidery Works
Logo digitizing for embroidery is the step where a picture of a logo becomes a stitch file. First, you clean up the logo art so it has clear lines and shapes. Next, you pick a size from your embroidery size chart and decide on the stitch types. Satin stitches work well for letters and outlines; fill stitches cover bigger areas.
You can also add a thin underlay stitch to support the top stitches. Once the digitizer finishes, you get a digital file that your embroidery machine reads. The file tells the machine how many stitches to make, where to place them, and how fast to move.
Work With Embroidery Digitizing Services USA
Using embroidery digitizing services USA makes your life easier, especially for tricky designs. You send your cleaned-up art and the exact size from your embroidery size chart. The service team loads it into special software. They choose satin, fill, and underlay stitches based on your embroidery size guidelines. They test the design in the software and send you a digital proof.
You review it and ask for changes if needed. When it looks good, they export a machine file like PES or DST. You then load it into your embroidery machine and start stitching. Working with these services saves time learning new software and helps you get perfect results, even if you are just starting.
Make Simple Artwork For Logo Digitizing For Embroidery
To get the best results in logo digitizing for embroidery, begin with simple art. Avoid thin lines, tiny text, and too many colors. Use bold shapes and clear edges. Measure the space on your material and pick that size on the embroidery size chart. Clean your artwork in a program like Canva or Illustrator by removing extra details. Save it as a PNG or JPG.
If you use embroidery digitizing services USA, send them your art and size notes. If you digitize yourself, import the art into your software and trace it. Always check your embroidery size guidelines as you work. Simple artwork makes the digitizing step smooth and your final stitches look bright and neat.
Choose Stitch Types With Embroidery Size Guidelines
Stitch types shape how your design will feel and look. For fine details, use running stitches. For bold lines, use satin stitches. For wide shapes, use fill stitches. Your embroidery size guidelines tell you how dense to make these stitches. For a small 2-inch logo, choose tighter stitches so details don’t fall out.
For a large 5-inch patch, use looser stitches so the fabric doesn’t pucker. Always test your settings on scrap fabric. This way, you see if the stitches lie flat and the colors pop. Adjust your guidelines if you need more support or less density. The right stitch mix makes each logo bright, smooth, and long-lasting.
Test Designs And Using An Embroidery Size Chart
Testing your design before the final run is smart. Hoop a scrap of the same fabric and run your file. Use the size you chose from the embroidery size chart. Watch for puckers, loose threads, or skipped stitches. Compare your test piece to your embroidery size guidelines. If the design is too tight, loosen the stitch density.
If letters blur, increase the size by a few millimeters on your chart. Keep testing until your stitches look neat and the colors stay in place. When the test matches your guidelines and chart size, you are ready to stitch on the real item. Testing helps you avoid mistakes and keeps customers happy.
Finish Steps For Embroidery Digitizing Services USA Projects
After you stitch your final design, trim off extra stabilizer from the back. Use small scissors or a heat-cut tool. Check the back of the fabric for loose threads and tie them off neatly. Lightly press the design from the back with a pressing cloth to flatten any bumps. Compare your finished piece to the size on your embroidery size chart.
Make sure it matches your embroidery size guidelines for height and width. If you used embroidery digitizing services USA, save the final file and your test notes. Keep backups of your digitized logos for future use. With these finishing steps, your project will look clean, professional, and exactly the right size every time.