You must have seen screen recording videos of desktop computers, but did you know that the same can be done using a smartphone too? This article will take you through the steps on “how to screen record on iPhone 12” using the built-in feature and some third-party apps.
We have also included the steps to edit screen recording on iPhone 12 and a few limitations related to this feature.
But before we move on to the tutorial, let us tell you that this feature allows you not only to record your screen but can also use it to take a screenshot on iPhone 12, iPhone 12 Pro, and iPhone 12 Pro Max.
How To Screen Record On iPhone 12?
If you want to screen record on iPhone 12, you must first add the screen recording feature to the Control Centre.
Below are the steps to turn the on-screen records on iPhone 12.
Step 1
Go to “Settings > Control Centre.”


Step 2
Scroll down to “Screen Recording” and tap the “+” next to it.

This will add the screen recording function to the Control Center. You can also change the position of the screen recorder by dragging it up or down or clicking on “-“to remove it from the Control Center.

Now that you have added the screen recording feature to the Control Center, here are the steps to use it.
How to Record your Screen on iPhone 12
When it comes to iPhone 12 screen recording, Apple gives you two options:
1. Screen recording with audio
2. Screen recording without audio
1. How to Record Screen With Audio on iPhone 12
There are instances when you need to walk somebody through a tutorial and keep your microphone on.
Here are the steps for it:
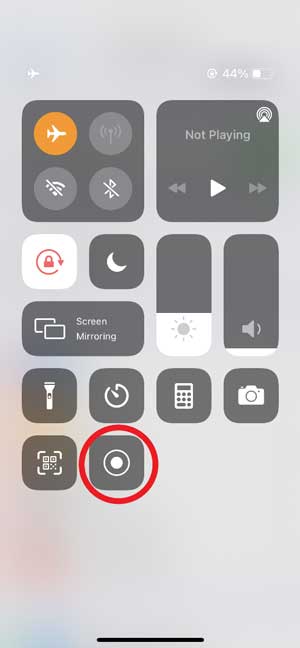
- Swipe down from the top right to open the Control Center, and long press on the “Screen Recorder” icon. A pop-up will appear.

- Tap on the “Microphone Off” button to turn it on. Now, tap on “Start Recording” to start screen recording with audio.

2. How to Record Screen Without Audio on iPhone 12
Sometimes, your requirement might only be to record a video without audio. However, this is already a default option when screen recording on iPhone 12.
For this purpose, follow the steps given below:
- Swipe down from the top right to access the Control Center, and tap on the “Screen Recorder” icon.
- After a 3-second countdown, the screen recording will start.

- Once the recording starts, you can do whatever you wish to record.
- When you’re done, tap on the recording time on the top left corner of the screen to stop the screen recording.


Although screen recording on iPhone 12 is quite a simple affair, many users have trouble finding their screen recording videos.
Where Will, the Screen Recording, be Saved on iPhone 12?
As soon as you click on the timer to stop screen recording, it will be saved in “Photos” by default.
To view your recording, go to “Photos” and hit play. You can share, delete, or edit it as per your requirement.

How to Edit Screen Recording on iPhone 12 with Photos App
As your screen recordings will be automatically saved in the Photos App, you can use it to edit them too.
However, it has limited editing options; by little, I mean you will only be able to trim, adjust colors, apply filters, and rotate/crop the video.
Here’s how to do it:
- Open “Photos” on your iPhone and select the screen recording video you want to edit.
- Click on “Edit” at the bottom-right corner. You will be shown four options to edit the screen recording.

- Trim the video: Click on the “Trim” icon and drag the yellow sliders at the start and end of the video.

- Adjust the contrast and exposure: Click on the “Adjustment” icon and set the parameters according to your liking.

- Apply filters: Click on the “Filters” icon and select your desired filter.

- Rotate/crop the screen recording: Click on the rotation icon and set it to the aspect ratio you want.

- Don’t forget to tap “Done” once you’ve finished editing the recording.
Screen recording on iPhone 12 and editing it using the Photos app is quite basic, but there’s a catch!
You cannot screen record everything!
ALSO READ: Marvel Movies In Order
Limitations to Screen Recording on iPhone 12
While screen recording can capture everything happening on your iPhone screen, including notifications and calls, there are exceptions.
You cannot screen record apps like Netflix, Amazon Prime Video, and Disney+ due to copyright issues.
However, you might be able to do it via third-party screen recording apps.
Third-Party Apps To Screen Record iPhone 12
Following are some feature-packed apps for screen recording on iPhone 12.
1. Record It!

Record it! Is a screen capture mobile app very helpful for screen recording while playing heavy games such as PUBG, COD, etc.?
It is simple and easy to use and supports AirPlay as well. It also allows you to capture the whole screen or a part of it with audio and video. So, download it from the App Store now!
However, if you’re looking for more advanced and accessible options, you can try other apps like:
2. QuickTime Player
QuickTime is a media player developed by Apple Inc. that allows you to format videos, pictures, sound, and screen records. Download it for free for macOS as well as Windows from Apple Store.

To run QuickTime, at least you must have the MAC OSX Yosemite version. This software requires you to plug your iPhone into your computer using a lightning cable.
Follow these steps to use QuickTime’s screen capture feature:
Step 1
Plugin your iPhone into your computer and launch QuickTime.
Step 2
Click on “Files > Movie Recording.” If your webcam is enabled, it will open a screen with your video.
Step 3
Now, click on the dropdown arrow next to the record button and select your iPhone.
You will now see your iPhone screen on your computer, and anything you do on your iPhone will be mirrored via QuickTime Player.
Step 4
Hit the “Record” button to start screen recording.
Let’s move on to another innovative screen recording software.
3. ScreenFlow
Compared to QuickTime, ScreenFlow is a reasonably recent video editing software created for macOS by Telestream, Inc. It offers multiple features such as adding highlights or annotations and supports various file formats such as AIFF, GIF, M4V, MOV, and MP4.
However, one of the significant drawbacks of ScreenFlow is that it does not have a free version. Its pricing starts at $129.00 per year per user. You can download the free trial or the paid version from this site.

This software also requires you to connect your iPhone to your computer using a lightning USB cable.
Now, follow these steps:
Step 1
Launch the ScreenFlow 5 app. A “Configure your Recording” box will pop up.
Step 2
Under the “New Recording” tab, check the “Record Screen From” option, and select your connected iOS device.
This will mirror your iPhone on your computer.
Step 3
Now, press the “Record” button and start screen recording your iPhone.
Whether you’re screen recording your iPhone 12 through the built-in screen recorder or third-party apps, the procedure is quite simple once you get the hang of it.
If you found this detailed guide on how to screen record on iPhone 12 helpful, check out our blog for the more useful info.